
Star Wars Outlaws: Defeating Jabba's Rancor - A Guide for 2026 Players
As a veteran of the galactic underworld, I can tell you that my first encounter with Jabba's Rancor in Star Wars Outlaws was a moment of pure, unadulterated panic. Here I was, Kay Vess, a scoundrel who's talked her way out of more tight spots than I can count, facing down a beast that seemed utterly unstoppable. My trusty blaster? Useless. My usual bag of tricks? Irrelevant. This wasn't a fight; it was a puzzle wrapped in scales and rage. If you're staring down that same maw right now, wondering how a simple smuggler is supposed to topple a Hutt's prized monster, let me walk you through the chaos. Remember, in the year 2026, this classic encounter is still a rite of passage for any aspiring outlaw.
The Rancor's Immunity and Your First Move
You'll learn the hard truth within seconds: your blaster is no good against the Rancor. Kay herself will mutter something about it being a waste of ammo. So, what's the plan? You can't shoot it, you can't reason with it. The answer lies not in direct confrontation, but in manipulation. You must bait the Rancor to ram into the large chamber doors. Think of it like provoking a mad bull—you need to make it charge.
Your primary tool for this is the environment. Look up! On the ceiling above you are two moving rails that carry large fuel canisters. Your strategy hinges on these. Wait patiently—patience is a smuggler's virtue, after all—until one of these volatile canisters is positioned near the rampaging Rancor. Then, take your shot.
The canister will explode and anger the Rancor. This is your cue. You have a brief window while the beast recoils from the blast to run towards the doors and wait for him to lunge. How do you know it's coming? Watch for the white angry-face icon above him, accompanied by a red meter filling up around it. Once that red circle completes its circuit, the charge is imminent. It's a tense, heart-pounding wait.

Timing your shot on the fuel canister is the key to enraging the beast.
When the Rancor gets terrifyingly close to the door, you must dive out of the way. Don't be a hero; be smart. If you time it right, you'll be treated to a cutscene where the beast slams into the reinforced doors, leaving a satisfying, if not yet sufficient, dent.
The Mid-Fight Complication: Hutt Guards
Just when you think you've got a rhythm, the game throws a wrench in the works. After the first successful door hit, the Rancor isn't your only problem. Three Hutt guards will show up as well. This is where your blaster finally gets to sing. Dispatch them quickly and efficiently. Why? Because you need to refocus on the puzzle at hand. The canisters above will soon start moving again, and you must repeat what you did before. Lure, explode, bait, and dodge. The doors will groan and bend a little more with each successful impact. But what happens when the environment itself stops cooperating?
The Critical Lever: Restarting the System
After the second hit on the chamber doors, your primary tool breaks. The rail carrying the fuel pods will jam and stop moving. It's a classic "now what?" moment. Your temporary ally, the bounty hunter Vail, will bark an order: restart the system by pulling a lever. But where in this vast, terrifying chamber is it?
The lever is cleverly—or annoyingly—hidden. It's on the opposite side of the room from where Vail is. In the heat of the moment, with a dazed Rancor stumbling about, finding it can be tricky. This is where your best friend, Nix, earns his keep. Use Nix's special sense ability to highlight interactive objects in the environment. The lever will glow, revealing its position on a distant wall. Then, with a simple command, send your furry companion to do the dangerous work. Nix will flip the lever, and you'll hear the satisfying mechanical grind as the fuel pods above start moving again.
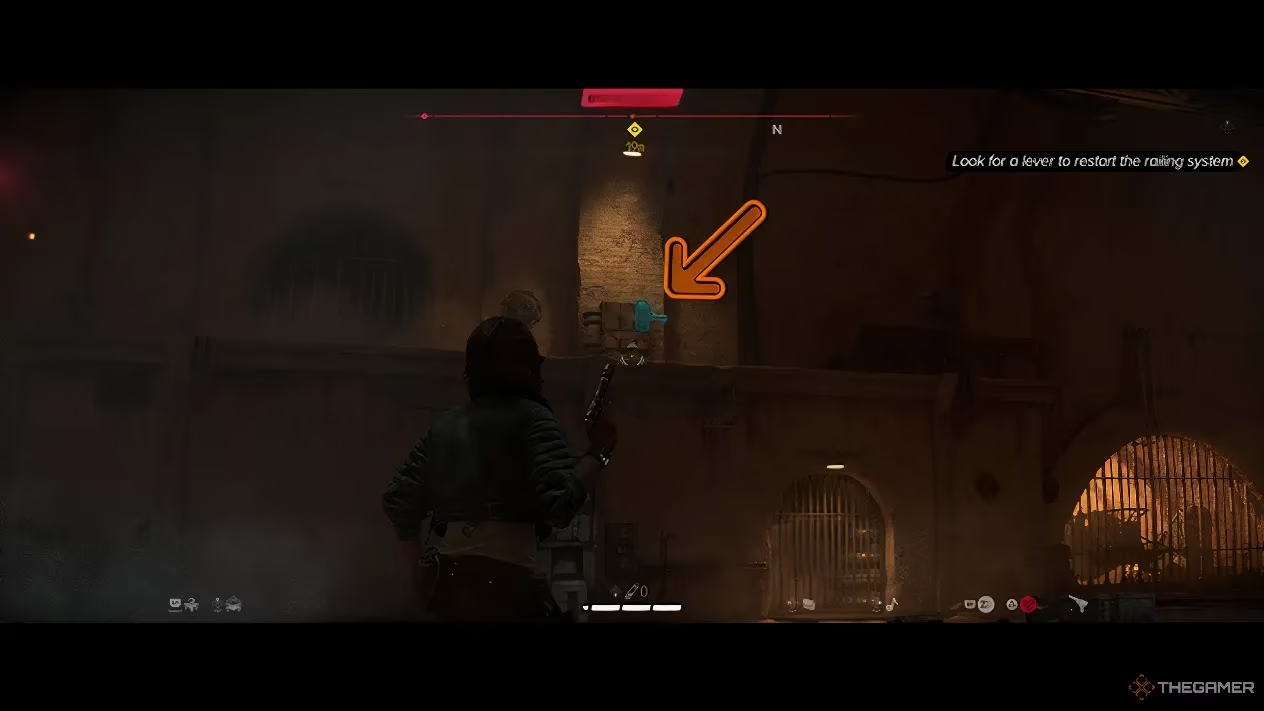
Nix's ability to highlight and interact with the lever is essential for progression.
The Final Confrontation and Escape
With the system back online, it's time for the final act. One last time, position yourself, blow up a fuel canister near the Rancor, and take your place by the battered doors. Wait for that familiar angry icon to fill with red, brace yourself, and at the last possible second, dive to safety.
The payoff is immensely satisfying. The Rancor will hit the doors with its full, final might, and the impact will be enough to knock him out cold. More importantly, the force will create an opening between the doors—just wide enough for you and Vail to squeeze out of that nightmare and back into the (relative) safety of Jabba's palace.
Key Takeaways for the Modern Outlaw (2026 Edition)
Even years after release, this fight remains a masterclass in environmental puzzle-solving. Here’s a quick checklist for success:
-
Forget Direct Damage: Your blaster is for guards, not the Rancor. 🚫
-
Use the Environment: The ceiling-mounted fuel canisters are your only weapon. 🎯
-
Master the Bait & Dodge: Lure, wait for the charge icon, and dodge at the last millisecond. ⏱️
-
Handle Interruptions: Deal with Hutt guards swiftly to maintain focus. 🔫
-
Utilize Nix: When the system jams, use Nix's sense to find and activate the lever. 🐁
-
Three Hits & Out: It takes three successful door slams to win. 3️⃣
This encounter perfectly encapsulates the spirit of Star Wars Outlaws. It’s not about being the strongest or the best shot; it’s about being the cleverest, the most adaptable scoundrel in the room. You outthink the monster, you use every tool at your disposal—including a very brave Merqaal—and you live to smuggle another day. So, take a deep breath, look up, and remember: in the face of overwhelming force, a little ingenuity goes a long way.