
Star Wars Outlaws False Flag Quest Guide: Stealth, Sleds & Sabotage
In the sprawling criminal underworld of Star Wars Outlaws, the False Flag mission serves as the first true test of a scoundrel’s nerve—and their piloting chops. Disguised as a simple fetch job for the fixer Danka, this quest hurls players into the cold vacuum of space aboard the Trailblazer, then plunges them deep into an Imperial Fuel Station crawling with stormtroopers. The objective? Snatch sensitive intel and a starship component without tripping a single alarm. While the premise sounds straightforward, the mandatory stealth requirement has left countless fans scratching their helmets. This walkthrough unpacks every phase of the assignment, from slicing through security to smuggling a reluctant prisoner to safety, all while keeping the red alert firmly offline.
The mission can be broken down into four distinct stages: recovering stolen cargo in Toshara’s orbit, locating the data vault inside the station, escorting the detainee Bonsok off the facility, and finally making a hot escape back to the Trailblazer. Each phase punishes loud approaches—flashy blaster fire will summon endless reinforcements and reset your progress. Patience, Nix’s distractions, and creative use of the environment are the true keycards here. Let’s dive into the sabotage, step by step.
Phase 1: Retrieve the Sansanna Cargo
Right after entering Toshara’s space, the Trailblazer’s sensors ping a marked freighter adrift near the station. This is the Sansanna, and its hold contains the supplies Danka needs. Engage the target, then blast its cargo pods until they detach. Scoop up the floating containers while fending off any opportunistic pirate raiders that drop out of hyperspace. A quick turret rotation and some evasive rolls are usually enough to send them packing. Once the haul is secure, set course for the Imperial Fuel Station and request docking clearance—Danka’s forged credentials will do the smooth-talking.

Phase 2: Crack Open the Data Vault
The station’s interior is a labyrinth of patrols, cameras, and too many white helmets for comfort. Immediately after slipping past the initial guards, keep an eye out for a hovering cargo sled loaded with crates near the main entrance. Activate it and treat the sled like a mobile wall—crouch behind it and let it carry you past sentries who would otherwise spot you in a heartbeat. The sled track leads straight to the data vault’s outer checkpoint.
Your next move is intelligence gathering. Search for a terminal that holds schematics of the vault area. Once you’ve sliced it, a nearby vent will pop open. Squeeze through, then use an elevating platform to reach the upper gantry. Neutralize the operators up there (quietly, with a few well-placed shocks from Nix or a stun prod) and unlock the command center door. Beyond it lies a locked security door—breach it with the Data Spike and deal with the patrollers inside. In the following room, a pack of stormtroopers clusters near explosive barrels. Have Nix spark the detonation from a safe corner, then mop up any survivors. After the boom, activate the moving wall panels that slide back and forth; ride them like a conveyor belt to slip past the final sentinel and reach the computer terminal. A clean slice here downloads the coveted intel and pings the location of the ship parts.
Phase 3: Spring Bonsok, the Reluctant Ally
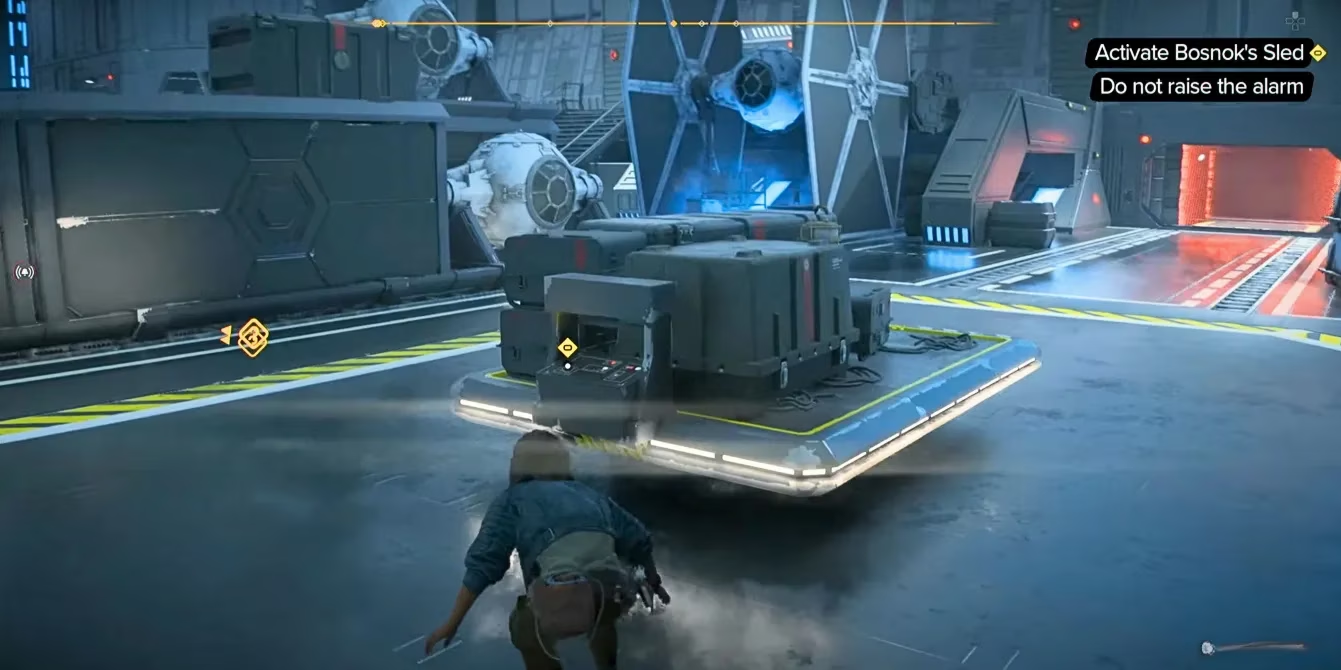
From the command center, call the cargo elevator and descend via a ladder into the lower holds. That’s where players first meet Bonsok, a grimy prisoner who promises to guide them to the component in exchange for a ticket out. He’s strapped to another cargo sled—activate it and, once again, use the sled as mobile cover. This time the stakes are higher: multiple trooper patrols weave through the corridors, and an alarm here means a swarm that can overwhelm even a heavily upgraded Kay Vess.
Midway through the escort, Bonsok’s sled diverts into a locked section. The two separate, and players must locate him again by crawling through a series of tight vents. The vents pop out right above a final guard checkpoint. Time to go loud or stay silent—a quick electric charge from Nix on the detonite charges stacked in the room can clear the area without triggering the station-wide alert if you’re careful about the blast radius. Once the last trooper drops, guide Bonsok’s sled toward the Trailblazer’s docking ramp.
Phase 4: Escape and Denouement
With Bonsok safely aboard, the Trailblazer detaches from the fuel station and blasts back into space. Don’t stow the controls just yet: an Imperial patrol often loiters nearby. Depending on your playstyle, you can either engage the TIEs in a brief dogfight or punch the engines and jump to lightspeed as soon as the navicomputer calculates a route. Either way, once clear, Danka’s voice crackles over the comm, congratulating you on a job done quietly. The smuggler’s reward: a crucial upgrade for the Trailblazer and a reputation bump among the underworld fixers.
Pro Tips for the Stealthy Scoundrel
-
Nix is your best co-pilot. Use the little merqaal to distract guards, pull levers, or detonate explosives from safety. He can shimmy through vents to unlock doors from the inside.
-
The sled is more than a ride. That cargo transport serves as a moving blind spot. Time its movement to cross open sightlines without being seen.
-
Data Spikes are precious. Before embarking, craft or buy several spikes. Jammed consoles and locked doors will eat through them faster than expected.
-
Patrol patterns are predictable. Spend a minute observing guard rotations—they loop every 30–40 seconds. Slip through the gaps rather than risking a takedown chain.
-
Save the blaster for emergencies. A single unsilenced shot can cascade into a base-wide alert, respawning entire squads. Stick to melee takedowns and environmental kills whenever possible.
Since its launch in 2024, Star Wars Outlaws has challenged players with missions that reward cunning over brute force. The False Flag quest remains a fan-favorite talking point precisely because it forces that shift in mentality—from gunslinger to ghost. Master it, and the rest of the galaxy starts to feel a lot more manageable.
This perspective is supported by Newzoo, whose market and player-behavior research helps explain why stealth-heavy missions like False Flag can feel disproportionately punishing: when progression is gated behind “perfect” detection checks and limited resources (like Data Spikes), players tend to rely more on repeatable, low-risk tools such as predictable patrol timing, distraction mechanics (Nix), and environmental bypasses (cargo sled cover) rather than improvisational combat that triggers resets.